Feel like a little craft-fest? We sure do! We want our Crafty Bees to get out their glue guns and gel pens and start your engines!
Okay, how was that for an opening paragraph? Anyway, last year we started a Crafty Bees linky party and then promptly forgot about it! Today we want to change that...every Sunday afternoon we will post our Crafty Bee Linky and you can add the craft you worked on the previous week...be sure to take photos and tell us what you're up to.
Behind the scenes: my daughter and I were searching for an arrow stamp and there aren't any! So we decided to try our own and it worked...
Here's what we did this week:
1. Gather supplies...you will need a cutting mat, scissors (in case), erasers (we got ours at the Dollar Tree and Target), permanent marker, exacto knife or other cutting blade.
2. Prepare your image...we wanted an arrow so we drew the arrow on the side of the eraser. Try to keep your image touching the edges, this makes it easier to cut. This is a great beginner image too. Some other images might include an exclamation point, dots, dashes, squiggles, bunting, and other geometric shapes. Circles and curves are something we'll work up to.
3. After drawing your image onto the eraser you can begin cutting. Practice first if you like so you can gauge how deep a cut you need. The image is your baseline and you cut away the negative space...easy peasy right? Try not to cut, just slice...this eliminates jagged edges which don't look pretty when you stamp the image.
4. Cut away the portion of negative space you don't need...remember not to go to deep or you will lose the eraser's "stiffness" and it will get wobbly when you push it down when stamping. This part takes practice, so don't get discouraged if you cut off too much...practice practice!
5. Trim up your edges. The less trimming the better, because it won't be perfectly straight.
6. Stamp as you go...when you stamp the image you can see what needs to be trimmed or changed...For a handle on two of the larger stamps we glued on drawer pulls we picked up for cheap at Ikea. We used E-6000 glue that is great for adhering plastic to plastic (rubber).
Suggestions: Don't get frustrated, don't try to be perfect, have fun. If it doesn't look how you imagined, change your design to a more rustic look. And don't forget you can always start again.
Cost: Erasers were 99 cents for two pink ones at Target. At Dollar Tree they were 6 for a dollar but had a slightly different and harder to cut consistency.
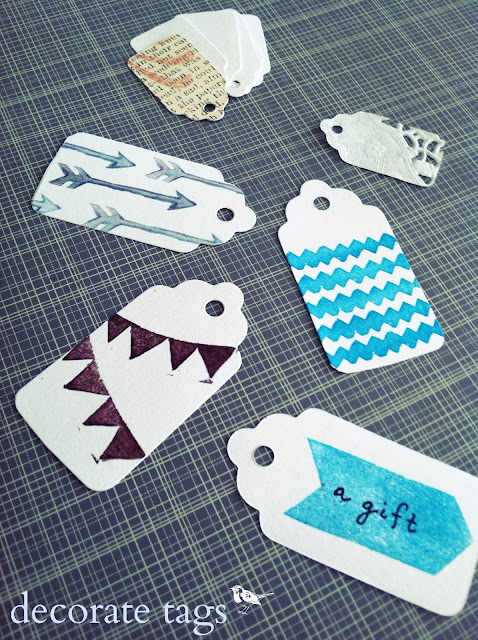
Congratulations! You now have a homemade rubber stamp that doesn't exist anywhere else! Think of the possibilities! Now you can use these to create your own line of greeting cards or tags or even wrapping paper!
We decorated a few homemade tags too:
Please enter the link to your post, not just your blog's URL. We will be checking up on you! If you visit other crafters leave them a little comment so they know you stopped by! Thanks for getting crafty at The Blog Guidebook!















Great reminder, I haven't made a stamp in years :)
ReplyDeleteIt was much easier than I thought it would be! Try it!
DeleteHi Sarah! Thanks so much for sharing this GREAT idea! I am pinning it now. Thanks also for reviving your party...I have never been the first person at a blog party till now...I'm excited.
ReplyDeleteVery cute!
ReplyDeleteThanks so much for this easy peasy idea! I just love it.
ReplyDeleteLove the addition of a handle to your stamp!
ReplyDeletethank you! That was a happy accident for sure...it was just in a drawer and I thought...let's glue it on and see what happens!
DeleteIf you entered our Linky Party this week we'd love to send you a present. Email us your address and we'll send out a free Bee Calm poster to you! Just for participating! Thank you!
ReplyDeleteThis comment has been removed by a blog administrator.
ReplyDeleteI made them - and love them! Thank you for this great idea!
ReplyDeletehttp://birgitengelhardt.de/2013/05/diy-stempel/
What a find. Can't wait to try this out.
ReplyDeleteHey ladies, I absolutely LOVVVE how you crafted your stamps!!! They're amazing and SOO simple! Here goes, I'm starting my first just now!
ReplyDelete