Buttons are cute little icons that are made to represent a blog...usually in a smaller pixel* format, like 150x150. A lot smaller than one's banner/header pixels.
So, if you love a blog or a product and want to show the world you care about that item or blog, then you'll want to copy and paste the code they offer beneath their button. If they don't have code posted, then all you have to do is right click the "picture" of the button and save it to your desktop as a .jpeg*. If code is available all you have to do is copy and paste. (BTW, you don't want the code to show when you add the button).
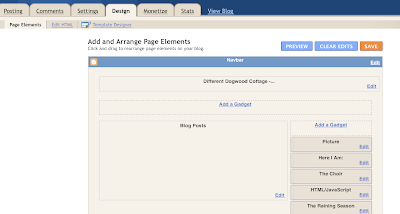
Open your blog "Design" tab and look at your layout.
 You will see in blue Add A Gadget at the top of each column in your blog. Usually we have no more than two extra sidebar columns.
Click Add A Gadget in the column of your choice and a box pops up with your choice of Gadgets.
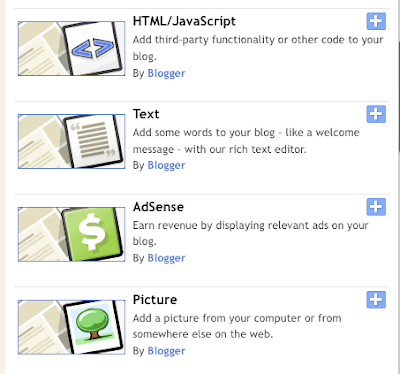 Click on the HTML/Java Script gadget, and this will open a box for you to paste the code you copied into it, and click Save.
 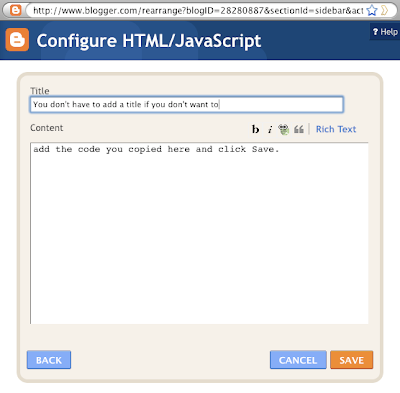 You can then drag this new gadget to the location up and down in your sidebar and drop it there. Click Save again.
If you saved someone's button as a .jpeg (picture), then in Add A Gadget click on the Picture gadget. Here you will be prompted to upload the .jpeg from your computer. Make sure to add the correct link so the button will click through to the blog or website it matches.
You may drag and drop to the location of your choice in your layout.
Always remember to Save, or your work will disappear!
Now View your blog. You will see the newly loaded button in your sidebar. It's always a good idea to click on it and make sure the link is working correctly. If not, just click the edit icon and re-type the info. Sometimes grabbed code does not work...it's always best to write the owner and ask them for a tip on correcting it.
Hopefully this mini-tutorial will help you grab a few buttons and not worry how to install them.
Click here and practice with one of our bee buttons...the code is posted below each button. If you'd like to learn how to create your own button and code, check out our tutorial here.
Good luck!
*definitions:
pixel
.jpeg
This tutorial will be added to our How To's page if you want to find it in the future.
















Yippee... i finally did this correctly! Great tutorial. Now I'm off to view the one about making code for my button. Thanks so much.
ReplyDeleteThis is usually one of the first questions bloggers have! I remember first starting and hunting all over to find out how. Now I am hacking things on my own. ;-)
ReplyDeleteLove your site - great resource for bloggers. A lot of my readers would probably find it helpful. I created another blogging resource: http://www.BlogConferenceNewbie.com - the blog and social media conference guide. Great minds think alike!
Have a great day!
Tamara
Wow! Thank you so much! That was so easy. I put your button on my blog for practice. Then I put a link on my Sunday School blog to the Institute Manual. So easy - I'm so excited.
ReplyDeleteThank you so much
Thanks I am still trying to figure out how to do all those things. I want my blog to start looking cuter
ReplyDeleteI have a question! I did the coding right, but my image keeps saying "it has been moved" and it won't show up! Do you know what I am doing wrong? Thanks so much for the help!!
ReplyDeleteThis was so helpful, I've been trying to figure this out for months!
ReplyDeleteThank you! This really helped me!woohoo!
ReplyDeleteFinally! I have been trying to figure this one out for a LONG time!
ReplyDeleteThank you so much. I've been trying unsuccessfully to add a button for awhile now. Thanks for the great steps. Your button is now on my blog.
ReplyDeleteI love your site!!
www.rayladventuresincooking.blogspot.com
Thank you, this really helped me out! Just getting started, this really saved some time.
ReplyDeleteI love this tip! Thanks!
ReplyDeleteThis is awesome, but it works only for HTML gadgets not others. I recently changed my blog template and in the new ones all my post images appear stretched and text squashed in my homepage but they are okay in the posts. My blog looks totally messed up. Any help would be really appreciated
ReplyDelete