We thought you might like to see this post from last year again...just in case you missed it. Picnik is a great place to start (they have free and paid accounts), but if you're a pro you'll know how to use Photoshop and PS Elements to create your button.
Have fun!
Making a sidebar button is very similar to making a banner when you use Picnik. (You may also use Photoshop, Elements or another image editing software).
Ability: Beginner
Here are some simple instructions to get you started:
Log in to your free Picnik account.
Upload your choice of photo or image from the web or your computer.
First, you will want to size the photo or image to that of a button. We chose 150x150 (pixels), but you can chose many sizes (125x125, 200x100, 175x150 etc.). In the Edit tab, click on Resize. You will see the boxes to add your button size to.
 Next, click Create, then Frames. We like Drop Shadow the best...but you can choose any frame style you like. Make sure and click Transparent Background when you use Drop Shadow.
(If you don't want a frame you can skip this step).
 Now you're ready to add Text. Click on Text and type in what you would like your button to say. Shrink it to fit onto your button and change colors as you require.
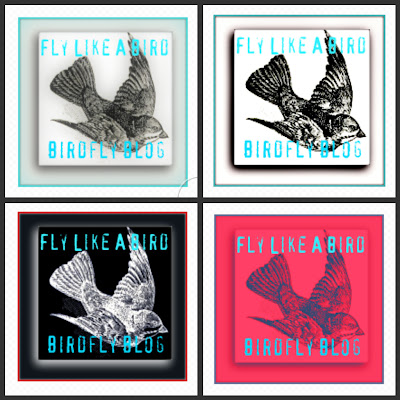
 Next step is Effects...this is the fun part! You can really change the look of your button by using these...try Cross Process, Lomo-ish, Duotone and Film Grain to name a few!
See the box of four images at the top of this post.
When you feel happy with the look, click Save & Share. Enter a name for your button in File Name. Make sure the dimensions are what you intended (such as 150x150). Change the .jpg format to .png format. Then click Save. You will be prompted to save the button to your computer. It's easiest to save to your Desktop so you can find things more easily.
Finished Button!
You will now be able to place your button .png in your sidebar - to create HTML code and a code box click HERE for a tutorial.
A great blog to get tips and tricks from is:















I LOVE IT ! I LOVE IT! I LOVE IT!
ReplyDeleteI have been searching and searching for an easy way and I did it!!!! Check me out!
project-create.blogspot.com
This is awesome! I've been blogging for a couple of years and have struggled trying to find some enhancements like this. I was able to put a groovy button on my blog that links to my photography site. Love it!
ReplyDeleteThanks for the info. I've never made a button for my blog, but now I know how if I want. I appreciate knowledge! :-)
ReplyDeleteThank you so much for the instructions. I am so new at this and am very green and frustrated! Thank you.
ReplyDeleteThank you Thank You Thank You. I cannot tell you how many times I have tried to create a button with no success! I found you and WaLa! I have a button with text. I am so happy and I just posted about it today! I am very grateful for your site.
ReplyDeleteUm...Picnik is no longer 'in service'
ReplyDeletePatty, yes, we know...but we wrote all of our tutorials using Picnik, so it will be a while till we have new ones up and running. Thanks!
DeleteLove PicMonkey! Can't wait for your tutorial...I made a button, but it's very homemade....!! Following you from Carrieloves.
ReplyDeleteCarolina. Working on a tutorial now...hope you haven't waited too long! Hugs!
Delete