(NOTE: we're not sure what the change is for the purchasing a .com via Blogger, but we have been unable to do it since 7/13)

Purchasing a .com for your blog (for example going from www.yourblogname.blogspot.com to www.yourblogname.com)
STOP! Before you go skipping over to GoDaddy to buy a domain, stop right there. You can do it ALL THROUGH BLOGGER! And it saves a lot of headaches. Simply Click on your Settings tab under "Publishing." There is a little blue link that says, "Need a domain? Buy one now." And it walks you right through all of the steps. How easy is that?! Thank you, Blogger.

 How To Leave a Comment (on another blog)
Leaving comments is one way to gain readers and make new friends. Make sure you are signed into your Blogger account or Google account. That way you'll be signed in and be able to comment without having to add your information again. At the end of the Post you are reading, there will be the word Comment. Click on that. A new page or box will pop up. (There are several choices in Blogger for commenting.) In the box that appears, there is a field for you to type in your comment. When you're finished typing, scroll down and make sure all your blogger profile info is filled in, then press Submit. Sometimes a Word Verification box will appear (not all bloggers require this), just enter the letters/numbers and hit Submit again. Your comment will be saved until approved by the blog admin, or it will appear in the comment list. Be sure to hit Submit after you've double checked spelling etc., because once you've submitted, you can't get your comment back.
 How To Add Your Profile Picture to Blogger
(so others can see you)
 How To Stay Safe in the Blog Jungle
There are several ways to ensure privacy on your blog.


(NOTE: Blogger In Draft is no longer available)

Blogger In Draft is a special version of Blogger where new features of Blogger are posted before they officially launch. It's a wonderful way to try things out, and get used to them. There is even a support blog to help you along the way. Find it all HERE. This is a GREAT supplemental site to this section of The Blog Guidebook. Visit Blogger In Draft for more blogging tips and hints!
 How to Change Your Template
Blogger has introduced a new Design feature recently. There are many designs now available for your template. They are located in your Design tab, under "Template Designer New!" If you choose to make changes, you need to back up your current template so you don't lose it (there is a huge orange button at the top to remind you of this). You can now adjust column width, number of columns, and many other features without adjusting HTML. It will show you a preview, and then you have to click "Apply to Blog" before it's official:


 How to Change Your Banner/Header
Click on your Design tab, then go under "Page Elements." You can access all of your sidebar gadgets/widgets (same thing), and your header and footer. You will see a space at the top to "Add a Header". If you click that, a window will open that allows you to configure your header. You can upload a custom or free header here, an image of your own, or just type in a name. There are options to allow your header appear instead of the text, and you can shrink it to fit a certain size. So check out all the options before you click Save!


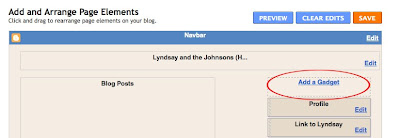
• From your Design tab, under "Page Elements", Click "Add a Gadget" from your sidebar options.
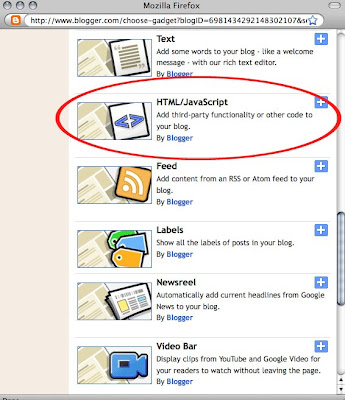
• Select "HTML/JavaScript" from the menu.
• Paste your HTML code into the empty Content space, and don't forget a title if you want one.


 How To Add a Blog Roll or list of blogs in you sidebar
Blogger In Draft has a tutorial for adding a new type of blogroll. The step-by-step guidelines are found HERE. But you can also add a list of blogs you read into your sidebar if you don't have Blogger In Draft. Here's how you do it:


In the top right hand corner of your nav bar (when looking at your blog's main page) click on the Design link. This will take you to your "Page Elements" behind the scenes. In the very top right click on small blue "Dashboard" link.

On the left it says View Profile, Edit Profile, Edit Photo, Edit Notifications. Click on Edit Profile. Blogger allows you to fill in as little or as much information as you like. You may not want to add personal information, such as Location or Birth date, etc. Scroll down and you will see a place to upload a photo. You can upload a picture from your computer here. Make sure you scroll to the bottom and click Save.
 How To Stay Safe in the Blog Jungle
(ensuring privacy)
There are several ways to ensure privacy on your blog.
• The first in your Settings tab under "Permissions". You can select who is allowed to be an author, and even view your blog. If you want a very private blog, you can assign a password that you have sent out to friends and family, to be entered before they view your blog:

• The second is to monitor your comments in your Settings Tab, under "Comments". You can ask for word verification, define who is allowed to comment, and even personally approve each comment before the post:

• Thirdly, you can create content that is more private. For example, exclude your location or other personal information from your Blogger profile. You can use nicknames or initial letters for your loved ones' names. And you can add as much or as little information about your life and family as you choose. The whole world has the ability to view a public blog, so blog at your own discretion!
(NOTE: Blogger In Draft is no longer available)

What is Blogger In Draft, and how can I use it?
Blogger In Draft is a special version of Blogger where new features of Blogger are posted before they officially launch. It's a wonderful way to try things out, and get used to them. There is even a support blog to help you along the way. Find it all HERE. This is a GREAT supplemental site to this section of The Blog Guidebook. Visit Blogger In Draft for more blogging tips and hints!
 How to Change Your Template
Blogger has introduced a new Design feature recently. There are many designs now available for your template. They are located in your Design tab, under "Template Designer New!" If you choose to make changes, you need to back up your current template so you don't lose it (there is a huge orange button at the top to remind you of this). You can now adjust column width, number of columns, and many other features without adjusting HTML. It will show you a preview, and then you have to click "Apply to Blog" before it's official:


You can also STILL CHOOSE from the old designs previously offered in Blogger! (Minima is the most common of these, and the easiest to adjust for widening width and adding columns if you prefer HTML hacks and tweaks.) These layouts are located in your Design tab under "Edit HTML." Scroll down until you see "Old Templates" in orange just below the HTML field. You can click the blue link that says "Select Layout Template." The Classic Template (the very original Blogger themes) are also located just below that:
 How to Change Your Banner/Header
Click on your Design tab, then go under "Page Elements." You can access all of your sidebar gadgets/widgets (same thing), and your header and footer. You will see a space at the top to "Add a Header". If you click that, a window will open that allows you to configure your header. You can upload a custom or free header here, an image of your own, or just type in a name. There are options to allow your header appear instead of the text, and you can shrink it to fit a certain size. So check out all the options before you click Save!

Changing Fonts and Color Settings
In the new Blogger (changes were made at the beginning of 2010), the fonts and colors are located in the Design tab, under "Template Designer." From there, click on "Advanced" from the menu of choices in the left column. There you can adjust fonts and colors. You can even select custom colors from a slider or color picker, and it offers colors used specifically in your blog. Pretty smart!
In the new Blogger (changes were made at the beginning of 2010), the fonts and colors are located in the Design tab, under "Template Designer." From there, click on "Advanced" from the menu of choices in the left column. There you can adjust fonts and colors. You can even select custom colors from a slider or color picker, and it offers colors used specifically in your blog. Pretty smart!

How to Add a Button to Your Sidebar
• From your Design tab, under "Page Elements", Click "Add a Gadget" from your sidebar options.
• Select "HTML/JavaScript" from the menu.
• Paste your HTML code into the empty Content space, and don't forget a title if you want one.
• Click Save. View your blog and you will see the button in your sidebar! It should be a clickable graphic that links to another blog or website.


How to Add the Followers (Google Friend Connect) Gadget in Blogger (or any Gadget for that matter)
Followers is a gadget automatically added when you create a new blog. But if for some reason you remove it, you might want to add it again. To do this, go to your Dashboard, click on the Design tab, under Page Elements. You will see an option to Add A Gadget to your sidebar(s), and other areas of your blog (like the posting area, header, and footer). Most gadgets/widgets (same thing) go in your sidebars. Scroll through the list and find Add Followers (or whatever gadget you would like to add). Click on this and follow the directions. Click Save at the end!**Note: When adding a button from someone else's blog, or a free background, or something to this effect, this is an HTML gadget. You will paste code into an HTML gadget, and when you click save, the item will either appear in your sidebar, or the background will load.
Followers is a gadget automatically added when you create a new blog. But if for some reason you remove it, you might want to add it again. To do this, go to your Dashboard, click on the Design tab, under Page Elements. You will see an option to Add A Gadget to your sidebar(s), and other areas of your blog (like the posting area, header, and footer). Most gadgets/widgets (same thing) go in your sidebars. Scroll through the list and find Add Followers (or whatever gadget you would like to add). Click on this and follow the directions. Click Save at the end!**Note: When adding a button from someone else's blog, or a free background, or something to this effect, this is an HTML gadget. You will paste code into an HTML gadget, and when you click save, the item will either appear in your sidebar, or the background will load.
 How To Add a Blog Roll or list of blogs in you sidebar
Blogger In Draft has a tutorial for adding a new type of blogroll. The step-by-step guidelines are found HERE. But you can also add a list of blogs you read into your sidebar if you don't have Blogger In Draft. Here's how you do it:
• From your Design tab, under Page Elements, click "Add a Gadget" in your sidebar:

• The Add a Gadget window will pop up. Select Blog Bist or Link List depending on how you want to enter the blogs (use Link List if you want to use links to blogs AND other sites, but use Blog List if you want to select them from the list of blogs that are in your reader or that you follow):

• It will then ask you to configure your blog list, and you can select blogs to add, or type them in manually:
• Click save, and it should publish to your sidebar!

How to Link to Facebook
You will first need to open a Facebook account or Page. (If you own a business, go with a Page). Then visit THIS SITE to get your Facebook badge! It should walk you though all of the steps.

Click here to add a Custom Signature to your blog!
Check out "Where Do I Start?" by Melanie Nelson for really great Blogging for Newbies instructions.
Check out "Where Do I Start?" by Melanie Nelson for really great Blogging for Newbies instructions.










Thank you Thank you Thank you
ReplyDeleteThis has been a lifesaver-I've added it to my favorites so I can continue to use your wisdom-thanks!
ReplyDeleteThank you. I now have my own domain name. Come visit me! I am now:
ReplyDeletewww.tillysnest.com
God bless you! what a lifesaver.
ReplyDeleteThank you!!!!
Great resource you're offering. Thanks for linking to Blogging Basics 101. :) I appreciate it.
ReplyDeleteYOU are {amazing} Thank You , Thank You, Thank You- I am 'oh-so-new' to the blogging world and have yet to post my own ideas and journaling because I'm having creativity problems (I feel like I have zero options), but apparently having beautiful headers {is} possible! Thanks for the inspiration and loads of helpful advice! My blog is: http://oohlalaposh.blogspot.com/ (if you have any other advice you'd like to share) :-)
ReplyDeleteGreat advice, as always and I linked this to my blogging post too!
ReplyDeleteThank you so much! As always, great, helpful information, given in simple easy to understand format!
ReplyDeleteThank the LORD for someone who can offer me helpful information!! At least now I don't feel so lost :)
ReplyDeleteThank you for sharing all this information!
ReplyDeletehttp://motoristinmutsi.blogspot.com
When I'm posting pictures in my blogger, sometimes a little option pops up that says "small, medium, large, x-large" etc, and I can just adjust the size by clicking on that. However, other times, that option doesn't pop up and I have to manually adjust the size of the pictures by adjusting the HTML code. When I do that, it is really hard to get the pictures to stay clear. Can you please help? Thanks!
ReplyDeleteJesse, I couldn't email you back because you are a "no reply commenter"...you might want to check that.
DeleteAnyway, the only reason I can think of is you may be in the HTML setting instead of the COMPOSE setting while writing your post and inserting photos. Just check the compose tab to make sure you're on the right tab. Good luck!
This comment has been removed by the author.
ReplyDelete