Okay, this is fun people! You can use my favorite photo editing site for FREE and create some fun graphics for your blog...
PICMONKEY wins every time...but feel free to use your favorite, of course!
Did you take some pictures for your blog the other day? Good. Make sure they are uploaded to your computer, and put them in an easy to find place, like your desktop...or a special folder.
Now open Picmonkey in your browser. You can only edit one thing at a time, but you can open multiple tabs in your browser if you want to have several photos going at a time.
There are some very basic steps that I've left out of this tutorial...if you need to know more, please email me or leave me a comment.
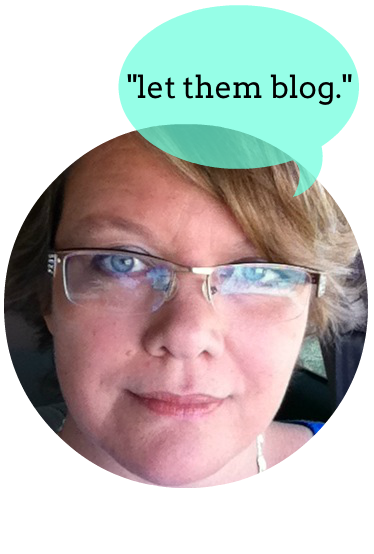
Upload your photo and then decide what shape you want the pic to be.
Click on the frame icon on the left and this will give you a choice of frames/shapes...I chose a circle. You can then size and move the circle around on your photo until you find exactly the right spot. Then click Apply. Make sure you leave your background transparent if you want it to be white when you add to your blog.
Next:
I decided to add a speech bubble, they come in many shapes...I decided to go with an aqua color that you can choose from in the pop up on the right...Speech bubbles and other cute graphics are all kept in the OVERLAY tab that you can find by clicking on the butterfly in the left column. Choose and size your speech bubble, I also faded mine slightly so the photo shows through.

Now let's add text to our creation. Click the Tt symbol in the left column, and this will take you to their font choices, I clicked on YOURS which allows you to use the fonts that you have on your computer...you can jump back and forth between these options easily. So click on the font you want and then click Add Text. A box will appear, click in the box and type in what you want it to say. You can also easily change the size of the font in the right have Text box...plus change font colors etc. Drag the text to where you want to place it. If you are completely thrilled about what you just created, look at the top of your screen area and click on the SAVE option, this will take you to the next page.
I like to save my images as PNG files...this will keep the background transparent when you upload to your blog.
You can see from the above image that I chose a name for my file and the .png tab. This page also shows you the dimensions of your image and the file size. Always good to know.
Click Save to My Computer and follow through to save to your desktop location.
You are now ready to add your saved image(s) anywhere to your blog.
Now grab your sketch pad and start doodling for a fun new banner...what are you good at? Can you draw, paint, quilt etc? Use those mediums in your sketch. On Day 4 we will chat more about how to add hand drawn art to your blog for a more personalized look.
Coming up in our 2nd week: editing more photos and how to use on your blog and Pinterest!


No comments:
Post a Comment
Comments are how we stay connected as bloggers. Let us know how you feel and we'll return the favor...stay calm and blog on!!! And guess what? You'll never find Word Verification on our blog...it gets kind of annoying when you can't read what WV wants you to verify right?
Note: Only a member of this blog may post a comment.